As an Amazon associate we earn from qualifying purchases. Thanks for your support!                               
×

Best Blu-ray Movie Deals


Best Blu-ray Movie Deals, See All the Deals »
Top deals | New deals  
 All countries United States United Kingdom Canada Germany France Spain Italy Australia Netherlands Japan Mexico
A Better Tomorrow Trilogy 4K (Blu-ray)
$82.99
5 hrs ago
Superman I-IV 5-Film Collection 4K (Blu-ray)
$74.99
 
Shudder: A Decade of Fearless Horror (Blu-ray)
$101.99
20 hrs ago
Jurassic World: 7-Movie Collection 4K (Blu-ray)
$99.99
 
Alfred Hitchcock: The Ultimate Collection 4K (Blu-ray)
$124.99
1 day ago
The Toxic Avenger 4K (Blu-ray)
$39.02
3 hrs ago
Superman 4K (Blu-ray)
$29.95
 
Back to the Future Part III 4K (Blu-ray)
$24.96
 
Teenage Mutant Ninja Turtles Trilogy 4K (Blu-ray)
$70.00
 
The Howling 4K (Blu-ray)
$35.99
 
Sexomania / Lady Desire (Blu-ray)
$19.12
 
Corpse Bride 4K (Blu-ray)
$23.79
15 hrs ago
What's your next favorite movie?
Join our movie community to find out


Image from: Life of Pi (2012)

Go Back   Blu-ray Forum > Home Theater > Home Theater Construction
Register FAQ Community Calendar Today's Posts Search


Reply
 
Thread Tools Display Modes
Old 10-20-2022, 02:06 PM   #1
ronboster ronboster is offline
Blu-ray Samurai
 
ronboster's Avatar
 
Jul 2009
9
Default DIY Skyline Diffuser

I decided to try my hand at making a skyline diffuser out of scrap wood and cheap furring strips etc. My goal is to learn how to use my wagner paint sprayer, an orbital sander and general DIY skills before tackling some other projects like a subwoofer kit or crown molding.

The tools I used were miter saw (which I bought for my mininalist screen wall project). A Wagner painter sprayer. An orbital sander. Wood clamps. All the tools were purchased on Facebook Marketplace.

I purchased furring strips from Home Depot, after I tried some pine fencing wood from Lowes. The fencing wood was not the best product to use, but it was the cheapest pine I could find. My goal was to stay around $40 for the wood and stain. I bought 1 piece of 1/2 plywood for the base.

I watched several YT video's of various skyline projects and got a general idea of the project.

Here's the page to create the dimensions of the columns and platform for the diffuser

http://www.mh-audio.nl/Acoustics/DiffusorCalculator.asp

First step, sanding down the lumber. I used an 80, 120, 220 for each pass. If possible I suggest sanding and cutting outside to keep the mess to a min.

Next step was to stain the wood. I wanted a more paint like finish since I was doing black vs a rustic look (which wouldn't fit as well with my HT). I tried a non-transparent, then switched to semi-transparent for the second diffuser. I decided to cut the wood after painting to make the painting process easier. There is a downside, which I talk about.

Once I knew how many individual pieces I would need, I went about making the cuts. I was making about 200 cuts per diffuser. To make sure I had the right size for each, I used a stop block clamped to my miter saw. The cutting gets a little monotonous. Don't let down your guard or you could lose a finger...which adds to the time to complete the diffuser and yes, you'll have less fingers to work with.

Here's the lack of experience on my part. Using this cheaper wood may have been the issue, or the fact I painted first or I need a different miter blade...but when I'd make the cuts, I get the "fraying" or rough cut on the edges of the pieces.

After the cuts were made, I'd sand down the sides with the "fraying" on the sides and top to create a smooth finish. This part of the project was the worst. After sanding, I used the card board "bottoms" from cases of soda or drinks that you'd buy at Costco (card board trays) to situate the individual pieces for the touch up paint on the sides and now the newly cut tops. If I just set them on a paint tarp, the pressure of the spray gun would send them rolling across the floor, so using the trays helped keep them in place.

Once everything was painted, including the base of the diffuser, I started the gluing process. Tips for gluing: Use a glue brush vs finger. I glued the sides that weren't exposed and the bottom for an overall secure fit. I found Titebond glue the best product (the thicker fast dry was my preference). I would lay out each row bottom to top vertical row..one at a time. I kept the pieces grouped by size, so I counted the number of #1's go to my other table and grab those, number of #2's etc etc. otherwise you can get confused or lose your place.

After completing the gluing on the first diffuser, I realized it looked somewhat unfinished. I had some scrap 1x2" pine boards from a previous project. I cut pieces to created a frame around the base. I used a butt joint, gluing the bottom and tops to the base (then clamping). Once those framing pieces had dried, I secured the sides using a 1 1/2 inch all construction screw. I wanted the strength and security of the screw, since I would be screwing the french cleats into the frame for mounting.

Finally, I used some tak cloth to remove any wood residue and then touch up paint.

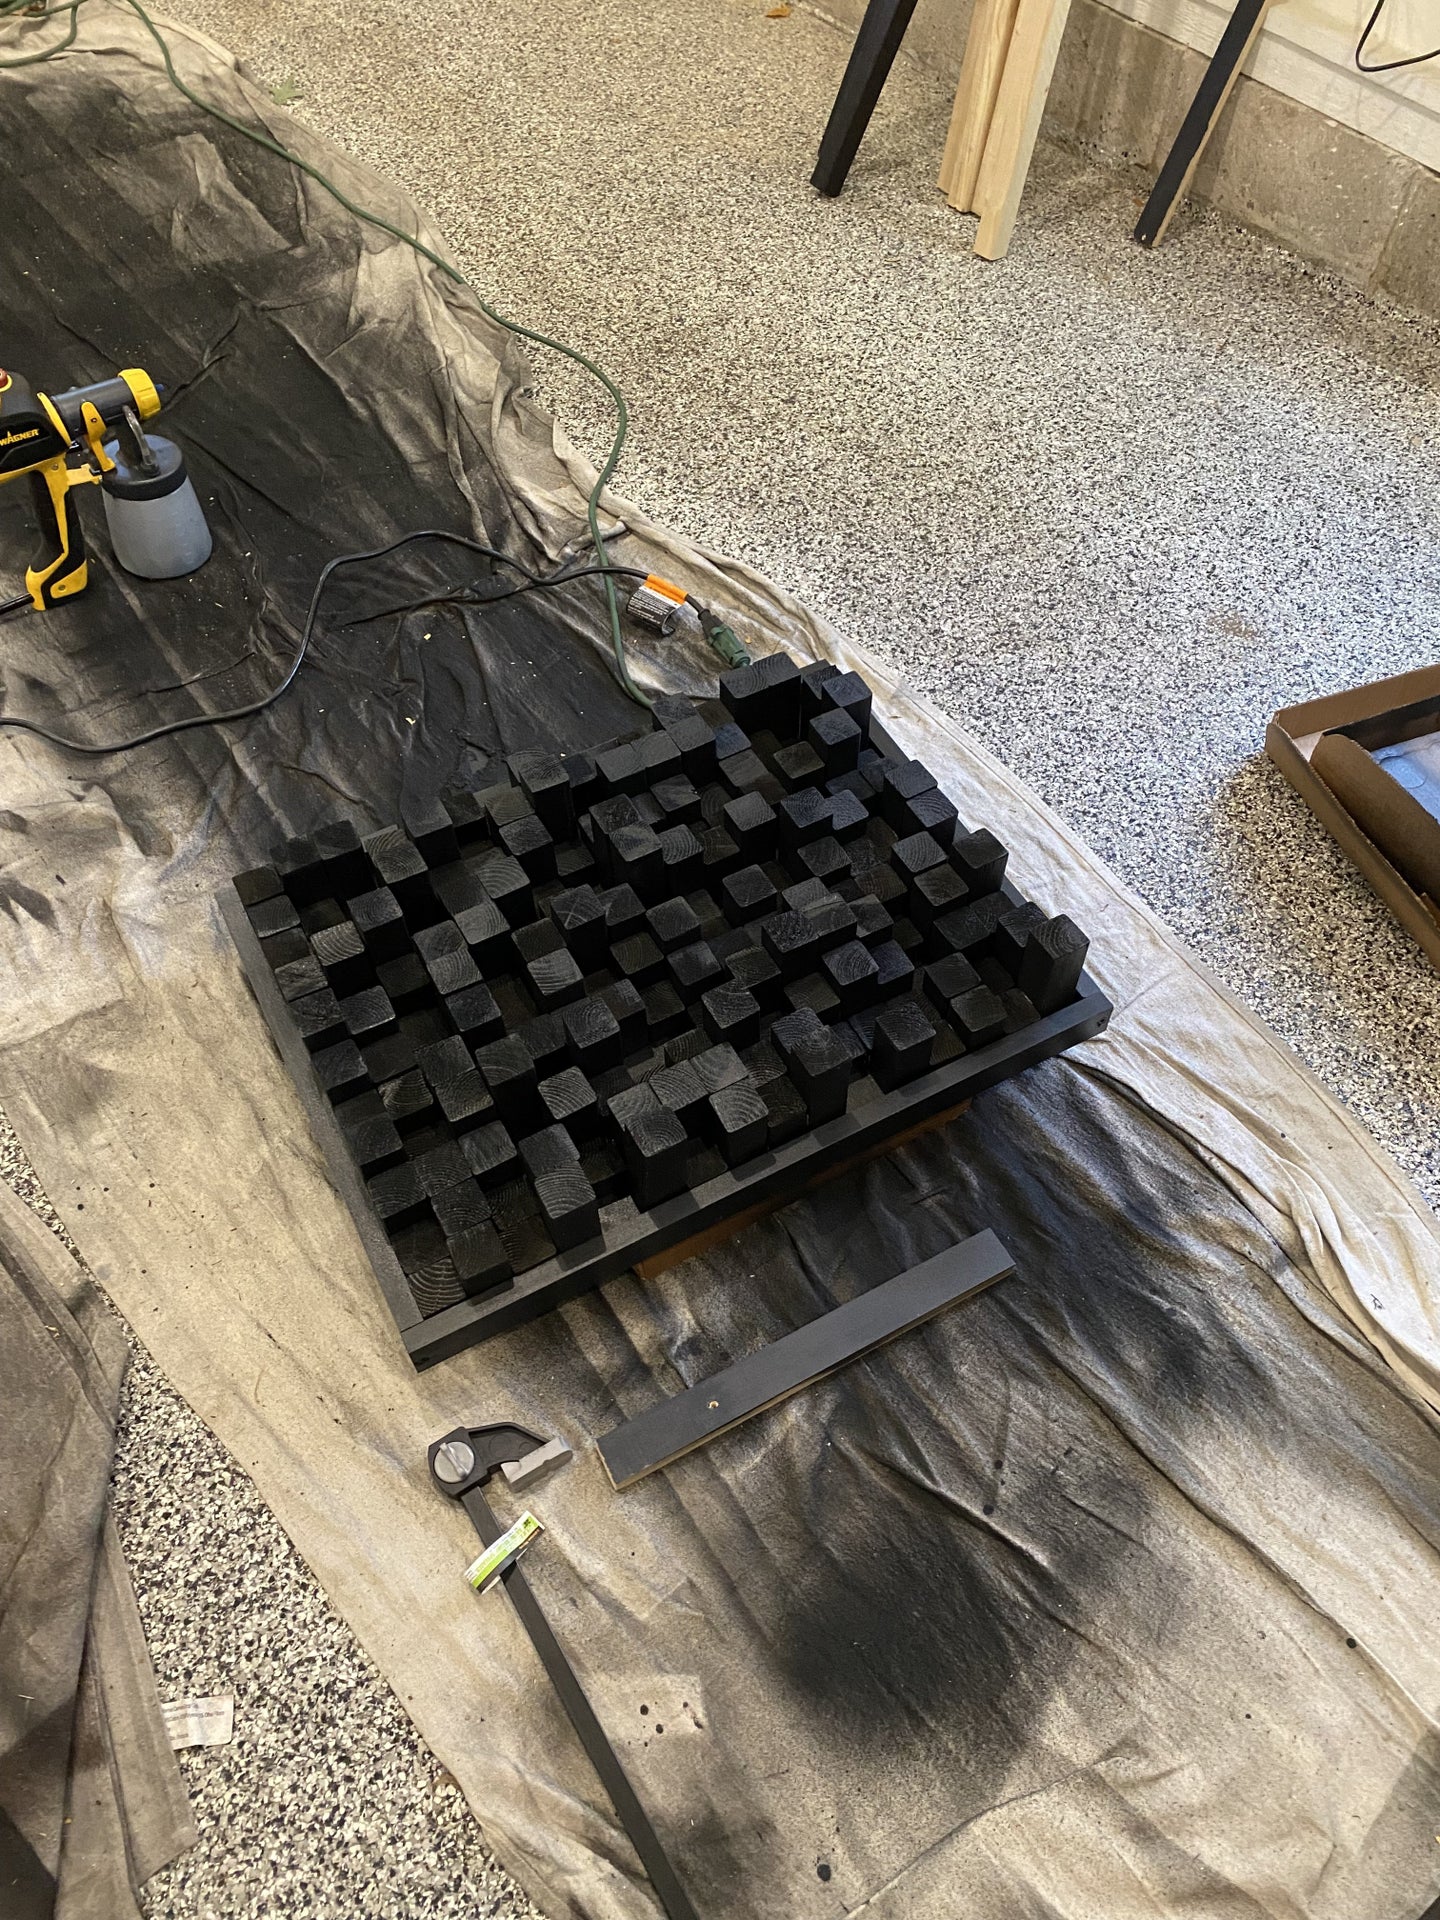
I've attached a picture of the first diffuser. The mistakes I made from the first one, I incorporated those changes into the second one. One big change is framing the base, BEFORE gluing the column pieces. I finding the frame helps guide the placement for a more finished look. The first diffuser is functional, but I wouldn't want a close inspection. This second unit has more finished look to it, after I learned when not to rush and tricks to avoid the initial mistakes.

Ron
Attached Images
File Type: jpg Skyline.jpg (91.2 KB, 21 views)
  Reply With Quote
Old 10-20-2022, 02:11 PM   #2
ronboster ronboster is offline
Blu-ray Samurai
 
ronboster's Avatar
 
Jul 2009
9
Default

Not sure why the attachment altered the rotation of the image in my original post? Here's a proper image (highlighting warts and all)....

My room is light controlled and the first diffuser is hidden somewhat in the shadows, so as not to expose my mistakes. The second unit will be near an can light, so I need to make sure it looks "finished".

As you can see in the image the rows are "off". I used two different types of wood in the pine fencing and furring strips. I used the warped pieces in the first unit and not having the framing in place to guide me...all contributed to misaligned rows.

Attached Images
File Type: jpg Skyline.jpg (91.2 KB, 2 views)

Last edited by ronboster; 10-20-2022 at 02:51 PM.
  Reply With Quote
Old 10-20-2022, 08:13 PM   #3
ronboster ronboster is offline
Blu-ray Samurai
 
ronboster's Avatar
 
Jul 2009
9
Default

pics of the second diffuser. First, gluing process. Second, touch up paint.


  Reply With Quote
Thanks given by:
Barry_NJ (11-30-2022)
Old 10-21-2022, 03:15 PM   #4
jackleg jackleg is offline
Member
 
Jun 2010
594
1
Default

Very nice! Thats pretty much exactly how I built mine. The one I did is roughly 4 feet wide and 16 inches tall. I used a french cleat to mount mine to my back wall between my rear surrounds. I went with 1/4 plywood as my base to glue the blocks to. Hard to keep the weight of the project down lol. Mine wouldn't hold up to scrutiny but it gets quite a few compliments, well more of the 'you made that?!?!?!' type lol.
  Reply With Quote
Thanks given by:
ronboster (10-21-2022)
Old 10-22-2022, 05:15 PM   #5
ronboster ronboster is offline
Blu-ray Samurai
 
ronboster's Avatar
 
Jul 2009
9
Default

Quote:
Originally Posted by jackleg View Post
Very nice! Thats pretty much exactly how I built mine. The one I did is roughly 4 feet wide and 16 inches tall. I used a french cleat to mount mine to my back wall between my rear surrounds. I went with 1/4 plywood as my base to glue the blocks to. Hard to keep the weight of the project down lol. Mine wouldn't hold up to scrutiny but it gets quite a few compliments, well more of the 'you made that?!?!?!' type lol.
I would love to see some pics of your project.
  Reply With Quote
Old 10-22-2022, 07:30 PM   #6
jackleg jackleg is offline
Member
 
Jun 2010
594
1
Default

690C2AC8-4303-45F8-81F8-E29A47FA6730.jpg
  Reply With Quote
Thanks given by:
ronboster (10-22-2022)
Old 10-22-2022, 07:30 PM   #7
jackleg jackleg is offline
Member
 
Jun 2010
594
1
Default

Not the clearest of pics admittedly. I paused a video I have on my phone to take the pic
  Reply With Quote
Thanks given by:
ronboster (10-22-2022)
Old 10-22-2022, 07:49 PM   #8
ronboster ronboster is offline
Blu-ray Samurai
 
ronboster's Avatar
 
Jul 2009
9
Default

That's very cool. What did you use for paint or stain? That look like a very dark rich black.
  Reply With Quote
Old 10-22-2022, 08:01 PM   #9
jackleg jackleg is offline
Member
 
Jun 2010
594
1
Default

I just used black spray paint. I think the way the light bounces off the different lengths of wood makes it look better than it should
  Reply With Quote
Old 10-22-2022, 08:05 PM   #10
jackleg jackleg is offline
Member
 
Jun 2010
594
1
Default

I also made 2 of these diffusers, one for each side wall towards the front of the sound stage
Attached Images
File Type: jpeg BAD01D48-8119-4730-A9F3-3449670206D1.jpeg (19.4 KB, 17 views)
  Reply With Quote
Old 10-23-2022, 12:12 AM   #11
ronboster ronboster is offline
Blu-ray Samurai
 
ronboster's Avatar
 
Jul 2009
9
Default

Quote:
Originally Posted by jackleg View Post
I also made 2 of these diffusers, one for each side wall towards the front of the sound stage
That's pretty cool. If you have any instructions: written or video of that design, I would love to see it.
  Reply With Quote
Old 10-23-2022, 12:25 AM   #12
jackleg jackleg is offline
Member
 
Jun 2010
594
1
Default

YouTube a guy named Jared turner. It’s a couple year old video he made. I prettt much did what he did and split it in half, one for each wall
  Reply With Quote
Old 10-23-2022, 12:26 AM   #13
jackleg jackleg is offline
Member
 
Jun 2010
594
1
Default

https://www.youtube.com/supported_br...tube.com/watch
  Reply With Quote
Thanks given by:
ronboster (10-23-2022)
Old 10-26-2022, 02:06 PM   #14
ronboster ronboster is offline
Blu-ray Samurai
 
ronboster's Avatar
 
Jul 2009
9
Default

Here are some pics of acoustic placement changes I've made in the room. First picture is the before. Second and third pics reflect the changes and additions.


  Reply With Quote
Old 10-27-2022, 08:19 PM   #15
jackleg jackleg is offline
Member
 
Jun 2010
594
1
Default

looks fantastic. are those combo diffusors/absorbers you have hanging as well?
  Reply With Quote
Old 11-04-2022, 01:27 AM   #16
ronboster ronboster is offline
Blu-ray Samurai
 
ronboster's Avatar
 
Jul 2009
9
Default

Quote:
Originally Posted by jackleg View Post
looks fantastic. are those combo diffusors/absorbers you have hanging as well?
Yup, absorbers with scatter plates from GIK acoustics. I had some extra materials, so made a 24 x18 skyline to use the remaining wood and paint.

Kind of getting the urge to make two more of the 24 x24 to mount just below the first two. Now that I got the knack of it.
  Reply With Quote
Old 01-06-2023, 02:41 PM   #17
ronboster ronboster is offline
Blu-ray Samurai
 
ronboster's Avatar
 
Jul 2009
9
Default

Added a second JTR subwoofer. Now I have an S-2 in the rear and an RS-1 in the front (behind the screen wall). Fully calibrated with REW and minidsp, then blended with DIRAC live gave me great results.


  Reply With Quote
Thanks given by:
crutzulee (05-24-2024)
Old 10-06-2024, 11:12 PM   #18
suka blyat suka blyat is offline
Banned
 
Oct 2024
11
169
Default

c
  Reply With Quote
Old 10-06-2024, 11:12 PM   #19
suka blyat suka blyat is offline
Banned
 
Oct 2024
11
169
Default

l
  Reply With Quote
Old 10-06-2024, 11:13 PM   #20
suka blyat suka blyat is offline
Banned
 
Oct 2024
11
169
Default

ll
  Reply With Quote
Reply
Go Back   Blu-ray Forum > Home Theater > Home Theater Construction


Posting Rules
You may not post new threads
You may not post replies
You may not post attachments
You may not edit your posts

BB code is On
Smilies are On
[IMG] code is On
HTML code is Off

Forum Jump


All times are GMT. The time now is 09:28 PM.