|
|
![]() |
||||||||||||||||||||
|
Best Blu-ray Movie Deals
|
Best Blu-ray Movie Deals, See All the Deals » |
Top deals |
New deals
![]() ![]() ![]() ![]() ![]() ![]() ![]() ![]() ![]() ![]() ![]() ![]() |
![]() $35.99 3 hrs ago
| ![]() $33.49 11 hrs ago
| ![]() $33.49 13 hrs ago
| ![]() $24.96 1 day ago
| ![]() $74.99 18 hrs ago
| ![]() $44.99 | ![]() $34.99 3 hrs ago
| ![]() $35.99 9 hrs ago
| ![]() $27.00 4 hrs ago
| ![]() $54.49 | ![]() $30.48 | ![]() $35.33 |
![]() |
#1 |
Member
|
![]()
Several people have PM'ed me before about my DIY screen I made for my HT setup. Since I just ran across this section of the forum, I thought I'd put the info here:
I didnt take any pictures during the build process (sorry!) but I did do some retro images in 3D to explain the structure of the frame, etc. Basically, the screen is like a huge artist's canvas, with a 2nd frame around the perimeter, that's covered in black material. The whole thing cost just over $100 and looks very good, both in-use, and not-in-use. The frame is made from 1X3s bought from the local home improvement center, cut to size and assembled with angle brackets and flat "splice" joint brackets. Everything was sanded very smooth once assembled to avoid any bumps in the screen, or sharp/jagged edges to snag the screen material. The screen material was bought off EBay. You can find all sizes available for the screen size of your choice. I got the black material for the border at a local fabric store. Cost a whole $6 for enough for a 110" screen. After that, the outer frame was cut and assembled in the same manner. The outer edge has been beveled to give a nice finished edge without looking bulky. I left approximately 1/8" in between the two frames, to allow for both the screen material, and the black border fabric. Detail view. Corner view of joints/profile: ![]() ![]() I spray painted the outer border black before covering in fabric, in case the wood might want to show through the fabric. The resulting 2 frames, should look like this once done: ![]() Then comes the process of stretching/tacking the screen/border material to the frames. Patience is key here, and when done properly,it results in an absolutely flat screen with no wrinkles. The material is wrapped around the frames and tacked on the back side. I recommend using an electric or air stapler. I did mine with a T-50 hand stapler, and it was pretty rough on the hands! Once both frames have been wrapped, a few flat brackets hold them together, and its time to mount to the wall! The 2 horizontal pieces on the upper back, are beveled along the bottom edge, and I used 2 blocks, with a matching bevel, to screw to the wall where I wanted to put the screen. The frame then hangs on these 2 blocks, and allows you to slide the screen left or right for precise positioning. Just be sure the 2 blocks are level with each other. ![]() The end results should look like this: ![]() More photos can be seen in my HT Gallery. Hope you'll decide to tackle this project before going to pay $800 for a commercial screen. Good luck and don't hesitate to ask, if you have any questions about the process. CD 2018 UPDATE! Made a new version of the same screen, only this time, with LED backlighting. Here's a preview: ![]() Last edited by C_Doc; 01-25-2018 at 04:34 PM. Reason: fixing broken links |
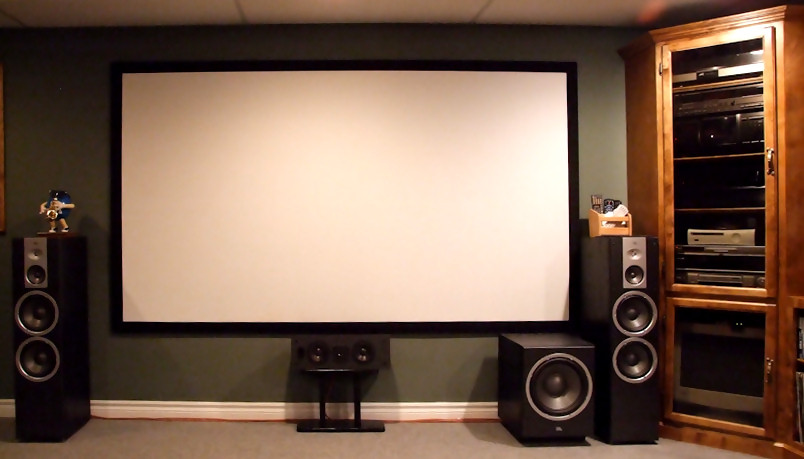
![]() |
![]() |
#2 |
Blu-ray Ninja
|
![]()
Nice! About the only thing I could think to request is to maybe include dimensions and links to brackets/supplies you used. I really like the 3d render- helps understand what you did.
This needs a sticky! (Oh... and why is your left speaker moved further from the screen than your right? It's really bugging me. ![]() |
![]() |
![]() |
#3 | |
Member
|
![]()
At the time, someone asked me for custom measurements to build a variant of mine, only at 100". Here's a PDF of the dimensions, and a materials list. The hardware is standard Stanley hardware, available at any hardware/home improvement store.
Inside Corners Flat Corner braces (Not shown in 3D, but can be used on the outer frame corners on the back side) Flat Mending plates (to attach inside/outside together) If there's enough demand, I'll work up a simple screen size / parts dimensions calculator in Excel that will help people modify the sizes to their needs. Quote:
![]() Last edited by C_Doc; 02-02-2011 at 07:56 PM. Reason: new domain for images/docs |
|
![]() |
![]() |
#4 |
Blu-ray Ninja
|
![]()
For better stereo separation probably. I'm not familiar with those speakers but many speakers are best when toed in toward the listener and are about two feet or more from the wall and corner. Can you move the screen to the left and center it more maybe? By the way, it looks very nice.
![]() |
![]() |
![]() |
#5 | ||
Blu-ray Ninja
|
![]() Quote:
Quote:
![]() |
||
![]() |
![]() |
#6 |
Member
|
![]()
Actually, the screen is where it's at, because of my PJ's placement, that forces it to be close to the audio tower like that. The right speaker is a bit squeezed between the two. The left speaker is further away by a few inches, just so that it won't cut the line of sight from the left viewing position. At some point, I'll remove a column that's in my way, and I can move the screen and right speaker a bit further away...
ANYWAYS, stop changing the subject! ![]() |
![]() |
![]() |
#8 |
Blu-ray Ninja
|
![]()
Quick post... I am making my 106" version of the screen listed here to go into my bedroom.
![]() ![]() ![]() ![]() ![]() |
![]() |
![]() |
#9 |
Blu-ray Ninja
|
![]()
Done with building the frame.
![]() |
![]() |
![]() |
#13 |
Member
|
![]()
Damn, why didn't I notice these posts?? Yes! Pictures! We... want... pic... tures!
Oh, and I'll expect a small dedication plaque to yours truly.. something discreet.. No more than 3' high I'd say. LOL! OBTW, I'd sent this file to someone via a PM, but seeing as someone has actually taken the time to build their own screen based on my design, I guess I'll post it up here: It's my calculator to allow you to "what if" your way to a new screen. I've tweaked it quite a bit, and its spot-on for the dimensions of my 110" screen, so it should be "safe". There are several common sizes, as well as place for you to custom input your own screen size. Last edited by C_Doc; 10-15-2015 at 04:54 PM. Reason: fixed link to calculator |
![]() |
![]() |
#17 | |
Junior Member
|
![]()
It`s good to see that other`s HT allso have big screen. A movie isn`t the same on a television
Quote:
|
|
![]() |
![]() |
#18 |
Senior Member
|
![]()
Great guide, Doc. I'm looking to be building myself a screen here soon using your guide, I was wondering if you could recommend me some specific material to use for the screen itself. Your ebay link comes up with a lot of choices, and I'm not sure which to pick. I would like to keep the whole project under $100, while still having a great, quality screen.
|
![]() |
![]() |
#19 | |
Member
|
![]() Quote:
![]() Looks like you managed just fine though, by the pics in your gallery. ![]() |
|
![]() |
|
|
![]() |
![]() |
![]() |
||||
thread | Forum | Thread Starter | Replies | Last Post |
DIY projection screen | Projector Screens | Driver_King | 43 | 12-23-2011 04:49 PM |
Dumb HT DIY Projector Question | Home Theater Construction | dolphinc | 18 | 08-04-2009 04:12 AM |
DIY 120" Projector Screen | Projectors | Grevlin | 2 | 06-06-2009 04:00 PM |
DIY screen question | Projector Screens | Beta Man | 17 | 02-08-2009 09:52 PM |
|
|