The benefits of adding polyfill are also explained in Post #2.
For all the materials needed and important links, go to the end of Post #2.
Also, see the following DIY subwoofers:
- Animo's Elemental Designs' Dual 13Av.2 Sealed subwoofer in Post #602.
- Big Daddy's 15" Dayton Titanic MKIII driver and a massive subwoofer enclosure built by Elemental Designs in Post #614.
- Big Daddy's 12" DIY kit in Post #621.
- Big Daddy's upgrade of the Hsu cylinder sub with an Exodus Shiva driver, go to Post # 587.
- CoMaToast's folded horn subwoofer in Post #779.
- Big Daddy's DIY subwoofer with Dual TC Sounds Epic Drivers
==========================================
HOW I REPAIRED & UPGRADED MY SUBWOOFERS, BUILT A NEW ONE,
AND UPGRADED MY VINTAGE POLK SPEAKERS
Please discuss your DIY subwoofers/speakers and any other enhacements in this thread. If you are planning to build, repair, or upgrade a speaker/subwoofer, you may want to read
A Guide to Crossover Networks.
REPAIRING MY SUBWOOFER
Several years ago (1998), my wife and I went to the headquarters of Hsu Research in Anaheim, CA to buy a subwoofer. I had heard nice things about Hsu subwoofers in high-end publications such as Stereophile. I had just purchased two Definitive Technology Super Towers with 15" subwoofers and built-in amplifiers. My main problem was how to best connect and adjust the new subwoofer. Even back then, I knew about the advantages of using multiple subwoofers in a small home theater room.
We were greeted by Dr. Hsu and spent several hours conversing with him and listening to music and movies with some of his latest designed subwoofers. At that time, the top-of-the-line subwoofer made by Hsu Research was HRSW12Va. It was a 12" cylinder-shaped sub that looked absolutely stunning. To make a long story short, we ended up buying two HRSW12Va subwoofers with Walnut top at a total cost of $1,543.50 (in 1998 dollars).
Technical Specifications
Frequency Response: 20Hz - 500Hz
Power Handling: 500watts RMS
Nominal Impedance: 4 Ohms
Sensitivity: 93db @ 1m. 2.83V
Finish: Seamless black knit cloth over cylinder, choice of three top finishes
Size : 23 inches in diameter, 22 inches in height
Weight: 65 lbs.
Feet: Three black anodized aluminum spiked feet.
The subwoofers did not have a built-in amplifier. The external 500 watt amplifiers were $650 each. I decided not to buy the amplifiers as I had already purchased a massive Cinepro amplifier from the manufacturer at a high-end audio/video show in Orange County, CA. The 6 channel
Cinepro was capable of providing 750 watts per channel into 4 Ohms, all channels running.
The subwoofers served us well for the past ten years. They worked well together and played bass beautifully for both music and movies. They were not boomy at all. I was so impressed with their performance that I decided to name them Aimie and Suzie. Most of you probably own male subwoofers that are too macho. Ours did not really play bass, they sang it.

Here is a picture of Aimie.
Anyway, a few weeks ago, the unthinkable happened. Aimie decided not to sing anymore. Initially, I thought there was a loose cable or something may have gone wrong with the amplifier. After further testing, I realized that Aimie had departed us. I then realized that I must have killed her a few nights earlier when I played the Dark Side of the Moon SACD so loud that I scared the living daylights out of her.

I became very upset and didn’t know what to do.

The next morning I called Hsu Research. The person on the phone was new and had no information about my subwoofers. I asked him to have Dr. Hsu call me. A few hours later, he called and I explained the situation. He said that he still carries the driver for my sub and it will be around $100. Since I only live about 50 minutes away from their warehouse, I told him that I will come and pick it up the next day.
After I hung up, I decided to go online and get some information about subwoofer drivers. Of course, my favorite site for this kind of information is
Parts Express. They are one of the best places in the world for accessories needed for speaker building. After wasting several hours online, I realized that there are many other options available for a 12" driver. It was then that I decided to be courageous and replace the dead driver on my subwoofer with an upgraded model. I figured that you only live once and it is only money. I ordered the
Dayton Titanic Mk III for $150 + Shipping. I was told that it will take approximately 5 days for the driver to get to my home. Here is a picture:
After I placed the order, I returned to my home theater room, I disconnected Aimie and decided to play some music and movies without her. It didn’t take me long to realize that Suzie was upset and her bass performance was not what I expected of her. Those of you who are familiar with my threads on subwoofers and standing waves know that the placement of one subwoofer in a home theater room is tricky. I decided to ignore Suzie and wait until the other subwoofer gets repaired. I closed the room and told Suzie that she better learn to behave or I will replace her with a new and improved woman.

The wait was finally over and the new 12" driver arrived. It was pretty heavy. I took it out of the box and set it aside and replaced the subwoofer in about an hour. I connected the wires and played some music and got excited that it was working. For the next several days I played lots of movies and music that contained heavy bass to break in the new driver. I calibrated my speakers again and to my surprise I realized that Suzie actually likes Aimie and cooperates with her. Initially, I had worries about mixing two different types of drivers, but the driver is only a small part of the picture. The enclosure (box) is far more important.
UPGRADING A SUBWOOFER
Several weeks passed and I began to enjoy the new and improved Aimie. Suzie was becoming jealous and was beginning to fight with Aimie.

To make the matters worse, I had caught the upgraditis bug. It was coming to my dreams every night and asking me to upgrade Suzie. I am sure most of you have already caught this bug as it is very contagious. Finally, I succumbed to the bug and decided to go ahead and do what is not good for my bank account.

However, I decided to document everything this time with pictures and guidelines for your benefit.
After spending several days on the Internet searching for subwoofer drivers, I decided to experiment with long throw aluminum woofers. A company I had heard about with good reviews was Peerless (Tymphany). Their subwoofers are designed in Denmark and made in China. Is there anything on this planet that is not made in China? Unfortunately, Parts Express was out of stock. I decided to order the Peerless 830952 (XXLS-308ALU, Long Stroke, 12" Aluminum Cone Woofer, 4 ohm for $222.35+Shipping from
Madisound in Wisonsin. Incidentally,
Martin Logan's Abyss subwoofer uses a low distortion aluminum-cone driver.
After waiting a week, the woofer arrived and I got busy. Here is a picture of Suzie in normal position.
This is Suzie upside down. Guys, please no lusting. She belongs to me.

This a picture of Suzie with her organ removed.

This is a picture of Suzie’s inside with poly-fill material. Poly-fill is generally added to dampen the subwoofer’s enclosure. See the benefits of poly-fill in Post #2.
I purchased additional
Poly-Fill material from Parts Express. They are $10.80 a pound and rather expensive, but they are the best.
The final step was to use
Gasketing Tape around the interior edge of the driver for an airtight attachment to the enclosure.
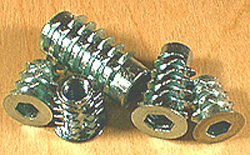
Finally, the driver was attached to the cabinet. You can use either
Phillips Pan Head Screws or
Wood Inserts and screws. For large and heavy drivers, Wood Inserts are preferred.
This is the finished subwoofer.
After replacing their drivers and adding more poly-fill to them, the two subwoofers felt as if they had gone through a sex change operation.

They scare me.
I need to change their names to masculine names. A few nights ago, I watched Journey to the Center of the Earth on Blu-ray. Even though the audio was only in Dolby Digital, the bass sound, when the dinosaur arrived, was shaking the foundation of our house. Two thumbs up to Aimie and Suzie.

You think the story ends here. Think twice. Now, Big Daddy is full of confidence and has a spare working 12" driver that he removed from Suzie. What is he going to do with it? Maybe he should build a new 12" subwoofer.
BUILDING A NEW SUBWOOFER
In the next few weeks, I spent a great deal of time researching subwoofer building on the Internet. I realized that the most difficult part of making a subwoofer is the cabinet. You need to have the tools and good carpentry skills.
Speaker Enclosure Material
Speaker enclosures can be made of anything rigid enough to not vibrate and cause distortion. The most common materials are Plywood, Particle board, and MDF (Medium Density Fiberboard). Plywood is more resistant to water, probably the strongest, and lightest. Particle board and MDF are much denser and may have better sonic properties. MDF makes the nicest looking boxes and is easy to work with.
My carpentry skills are good, but I don’t have all the tools, particularly for cutting a nice round circular opening on MDF wood and a square cut for the amplifier. In addition, the cost of making a cabinet and buying the necessary tools would be a lot higher than buying ready-made cabinets. Therefore, I decided to order a ready-made enclosure. After doing an exhaustive search, I limited my choice to three sites.
Subwoofer Enclosures:- Most sites offer subwoofer boxes with two choices of carpets: grey or black. HiFi Sound Connection offers high quality boxes that are painted in black and the prices are very reasonable.
- Klaus Audio offers custom made boxes with carpet finishes or plain wood finish that you can paint or stain and varnish. You can order custom made enclosures in different sizes, with choices of Slot or Flared Ports. This is by far the best site for subwoofer enclosures.
- The last option is Elemental Designs. They make great subwoofers, but they are not necessarily the most attractive ones. You can order custom subwoofer enclosures from them, but their prices are high.
- Ready-made subwoofer kits are also available from Parts Express. They come in different sizes and prices.
I finally decided to order a ready-made vented subwoofer enclosure from HiFi Sound Connection. Since I did not possess the necessary cutting tools, I made the decision that the subwoofer will be a passive one with an external crossover/amplifier. The cabinet I ordered was $64.95 + Shipping. It arrived in less than a week. Immediately, I marked where the driver was going to be installed and drilled very small holes for the installation screws. This is a picture of the empty box.
The first step after drilling the holes was to attach a 15" pair of wires with small
Disconnects from the inside to the speaker terminal binding posts.
Who came up with this name? You need disconnects to connect something. It does not make much sense. 
They are available at the auto department of Wal-Mart or the electrical department of Home Depot/Lowes.
Before doing any additional work, I had to install spikes or legs. I knew from experience that subwoofers need to be moved around for optimum bass sound. I therefore decided to install casters instead of spikes. I was in no mood to carry a heavy subwoofer around.
Next, I covered the inside of the box with
Dampening Sheets and filled it loosely with Poly-fill material. You can use
1/2" Acoustic Foam or
1" Acoustic Foam instead.
As I stated before, Poly-fill from Parts Express is excellent, but very expensive. You need two bags and it will cost you over $20. Standard poly-fill material is available at Wal-Mart and most craft and fabric stores. They are a lot cheaper.
The final step was to connect the woofer to the wires with female disconnects and attach it with black screws to the box. To make sure the subwoofer is attached to the enclosure without any air leakage, it is a good idea to put a layer of gasketing tape around the edge of the interior of the subwoofer driver.
This is the finished subwoofer.
I then moved the subwoofer to my two channel room and connected it to the my vintage Polk RTA-15TL speakers. Fortunately, I had an old DBX 300 watt subwoofer amplifier and a HSU Research crossover network that I had purchased with my two HSU subwoofers in 1998.
With the help of an SPL meter and test tones, I calibrated the sound with a crossover frequency around 50Hz. Since the driver was over 10 years old, it did not need a break-in period. With a lot of anxiety I started playing music. It was so much better than before that tears of joy came to my eyes.
")
A few minutes later my wife walked in from work and asked me if I had bought new speakers. I showed her the finished subwoofer. She was very impressed with the new sound and commented that I should start a subwoofer manufacturing business.
Move over Elemental Designs. Big Daddy is in town. 
REFURBISHING AND UPGRADING AN OLD AND WORN-OUT SUBWOOFER
In 1989, I bought a DBX 15" down-firing sealed subwoofer. It was a passive sub, but had an internal crossover network set at 120Hz. I also bought an external DBX subwoofer amplifier to drive it. Currently, I am using that amplifier to drive the subwoofer that I built for my two-channel system (see pictures above). The sepcifications of the old subwoofer are listed below.
Specifications
Dimensions: 24" H, 18" W, 18" D
Recommended Power: 20 - 250 Watts
Nominal Impedance: 6.3 Ohms
Sensitivity: 90.5 db
Crossover: Fixed at 120 Hz, 12 db/Octave
Woofer: 15" Polyvinyl Acetate-Coated
I used the subwoofer with two small Infinity satellite speakers in a 2.1 system. After a few years, I bought better speakers and stopped using that system. The subwoofer was mostly in the storage room picking up dust and going to waste. Recently, after I upgraded my Hsu subwoofers and built a new sub, I got the urge to upgrade the old and forgotten monster. The cabinet had minor scratches and a couple of the legs had minor cracks and were a bit loose.
I decided that before I do anything, I should order and buy the material needed to repair the sub. I went to my favorite speaker-building Web site, Parts Express, and ordered a
15" Dayton Titanic MK III woofer, one
Subwoofer Terminal Plate, and dampening sheets. I also went to Home Depot and bought 4 casters, several corner brackets, wood repair epoxy putty, and some screws. These are the pictures and the specifications for the Titanic MK III 15" driver:
Specifications of the 15" Titanic MK III:
Frequency range: 19-500 Hz
Power handling: 800 watts RMS/1,100 watts max
Impedance: 4 ohms
Frequency at Resonance (Fs): 24 Hz
Sensitivity: 91.7 dB
I had to wait about 5 days to receive the material I had ordered. This is a pictorial demonstration of how I refurbished and upgraded the subwoofer:
Step 1. I removed the woofer, the speaker terminal, and the crossover that was attached to the terminal.
Step 2. I used the corner brackets to reinforce the old subwoofer’s legs, repaired the cracks with wood epoxy putty, and attached the casters.
Step 3. I widened the speaker terminal opening because the one I had ordered from Parts Express was slightly bigger. Then, I attached the new terminal plate with small screws.
Step 4. I attached the dampening sheets to the inside walls of the cabinet.
Step 5. After attaching two small wires with disconnects to the speaker terminals, I filled the cabinet with poly-fill material.
Step 6. I tested the new woofer to make sure it was not defective, connected the wires from the terminal, and attached it to the cabinet enclosure.
Step 7. I attached my new company’s logo to the subwoofer and placed it in the rear of my home theater room and ran a long RG6 subwoofer cable from my Denon receiver to the location of the new subwoofer. Keep in mind that I already have two modified 12" Hsu subwoofers in that room. In addition, the two Definitive Technology Super Tower front speakers have 15" powered subs inside them. That makes five subwoofers all together. However, only three of them are connected to LFE out. The two built-in Def Tech subwoofers are connected to the front pre-outs.
The crossover and volume control from Pyle Pro controls the subwoofer.
Step 8. To power the subwoofer, I decided to use an external powerful amplifier, not one of those amplifier plates.
Several years ago (1993), I got an exceptional deal on two Carver M-1.0t Amplifiers from a retailer that was going out of business. Currently, I use one of them to drive the two Polk RTA-15TL speakers in my two-channel system. The other one was connected to an old Yamaha receiver to drive two speakers in the family room. I wasn’t using that system very often. I decided to disconnect the amplifier and have the receiver drive the speakers. I figured that the amplifier will get much better use with the new rebuilt subwoofer. According to the Owner’s Manual, the amplifier is rated 1,000 watts RMS into 8 ohms, single channel. My subwoofer is 4 ohms. I am assuming that the amplifier can power the subwoofer up to 2,000 watts RMS, more than enough to create an earthquake in Southern California.
The Moment of Truth
I calibrated my system after I broke in the new subwoofer for several days. This new subwoofer is unbelievable. It is powerful, accurate, musical, thunderous, tight, loud, and damn beautiful (sonic wise). This is by far the best subwoofer that I have ever owned and I have owned many over the years. It rocks.

I know what some of you are thinking. Big Daddy is a bass freak and has gone completely mad.

Let me tell you something. The idea of multiple subwoofers is not about louder SPL. It is all about getting a smooth and even bass across the entire room. My sound system is calibrated perfectly with the help of Audyssey MultEQ and my old reliable Radio Shack digital SPL meter. Every speaker in the room is calibrated perfectly to 75 db. This includes the subwoofers. When I walk around the room with the SPL meter, the bass sound varies between 73 and 78 db. In the main seating area, it is perfectly 75 db for all three seats on the sofa. This is outstanding performance for a dedicated home theater room. Those of you who have one subwoofer should try this. You will notice that the variation across the room is much larger. In fact, there may be locations in your room with terrible bass response.
ANOTHER 15" SUBWOOFER
I built another 15" monster subwoofer for my HT room. I had upgraded an old DBX sealed subwoofer a couple of months ago. Although its performance was good, it did not mix well with the other three ported subs in the HT room. I decided to take the driver out of the that sub and put it in a new ported cabinet.
The driver was the same 15" Dayton Titanic MK III that I had originally purchased a few months ago from
Parts Express. See pictures and specifications in Post #1.
I also purchased 5 sheets of
1/2" Acoustic Foam at a cost of $8.97 + shipping per sheet of 18" x 24" and one pound of
Poly-Fill material for $10.80 + shipping and standard generic poly-fill from Wal-Mart for $3. I mixed the two.
The cabinet was from
HiFi Sound Connection at a cost of $74.95 + shipping.
Cabinet Specifications:
Precision Constructed with 3/4" MDF
Black coating: Seven Sprayed on layers for a long lasting, durable, water resistant enclosure (same technology as spray-on bed liner)
Includes Built-In Terminal Cup(s)
Slot Ported Enclosure
Width: 21", Height: 16", Depth: 18"
First, I marked and drilled small holes for the driver, and covered the inside of the box with dampening foam and filled it loosely with Poly-fill material. I also connected a set of speaker wires to the inside of the speaker terminal binding posts.
Next, I used
Gasketing Tape around the interior edge of the driver for an airtight attachment to the enclosure.
The final step was to connect the wires to the driver and use Wood Insert Nuts from
Professional Hardware & Supply Co. to attach the driver to the cabinet. Wood inserts work better than regular screws for large and heavy drivers.
This is the finished subwoofer.
I placed it on the new sub riser that I had recently built.
I used the same Pyle Pro external crossover and Carver amplifier as described earlier.
I now have enough subwoofers for every room in the house, including the bathrooms. My wife says that our house is fully
SUBWOOFERIZED. I don't agree. I think I should build an 18" or 21" before I fully retire from subwoofer building.

MATERIALS NEEDED AND LINKS
Continued in the next post.
")
")
")
")
")
")
")
")
")
")
")
")


 Threaded Mode