As an Amazon associate we earn from qualifying purchases. Thanks for your support!                               
×

Best Blu-ray Movie Deals


Best Blu-ray Movie Deals, See All the Deals »
Top deals | New deals  
 All countries United States United Kingdom Canada Germany France Spain Italy Australia Netherlands Japan Mexico
The Mask 4K (Blu-ray)
$35.00
1 day ago
Airport: The Complete Collection 4K (Blu-ray)
$67.11
1 day ago
Dan Curtis' Classic Monsters (Blu-ray)
$21.31
12 hrs ago
U-571 4K (Blu-ray)
$29.99
18 hrs ago
Halloween III: Season of the Witch 4K (Blu-ray)
$14.37
1 day ago
Hard Boiled 4K (Blu-ray)
$49.99
 
Outland 4K (Blu-ray)
$31.32
1 day ago
Dogtooth 4K (Blu-ray)
$22.49
 
Creepshow: Complete Series - Seasons 1-4 (Blu-ray)
$68.47
 
In the Mouth of Madness 4K (Blu-ray)
$36.69
 
Twin Peaks: Fire Walk with Me 4K (Blu-ray)
$34.99
13 hrs ago
Corpse Bride 4K (Blu-ray)
$29.96
 
What's your next favorite movie?
Join our movie community to find out


Image from: Life of Pi (2012)

Go Back   Blu-ray Forum > Home Theater > Home Theater Construction
Register FAQ Community Calendar Today's Posts Search


Reply
 
Thread Tools Display Modes
Old 02-18-2010, 04:11 PM   #1
NorCo_1806 NorCo_1806 is offline
Blu-ray Samurai
 
NorCo_1806's Avatar
 
Aug 2009
Colorado
41
465
94
1
Talking My Custom TV Stand

Long time poster, first time thread-starter. Just wanted to say how much I enjoy this site.

Anyway....was gonna post this in another thread. But then thought, "why not toot my horn as loudly as I can?"

So here it is, my first thread, about my TV Stand.

Like many, had been searching and searching. Found a few things I loved...but I don't have multiple hundreds of dollars to spend. And I like to work with tools, so I considered starting from scratch.

But that wouldn't have been too eco-friendly now would it?!?!

So I bought a dresser, from a "market place" web-board through a friends work. Picked it up Tuesday evening, brought it home the 50-miles or so. Had a friend come help me unload it. And started tearing it apart.

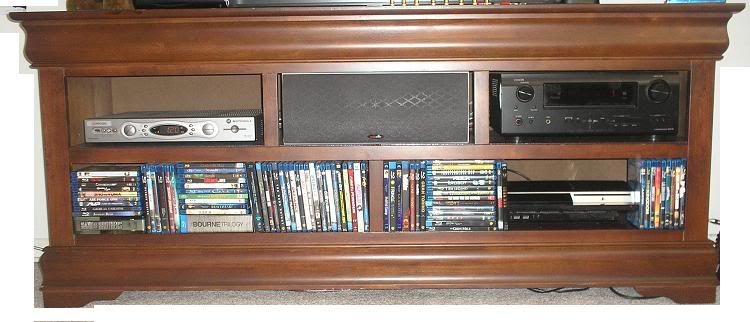
I didn't take any in-between shots...stupid, I know. But here's the finished product.....reminder...this is Thursday, brought it home Tuesday night.


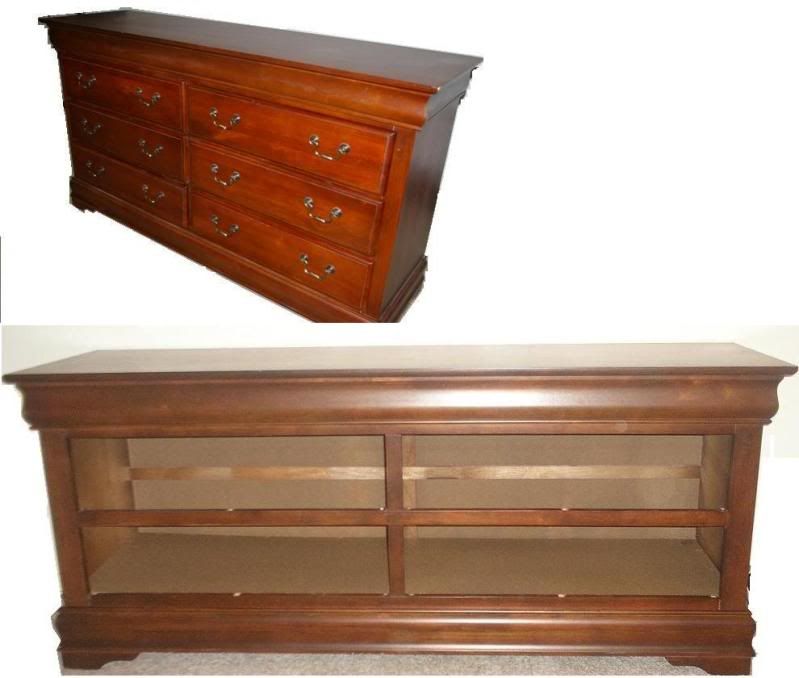
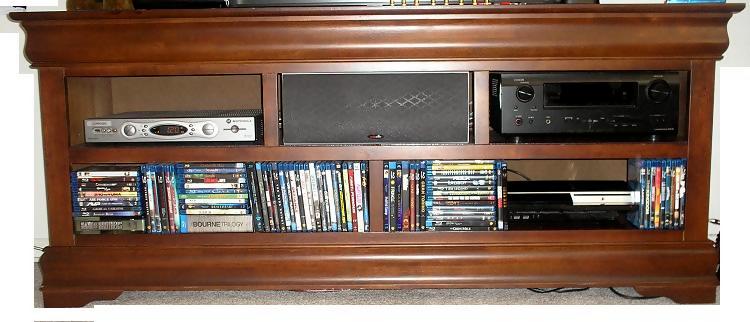
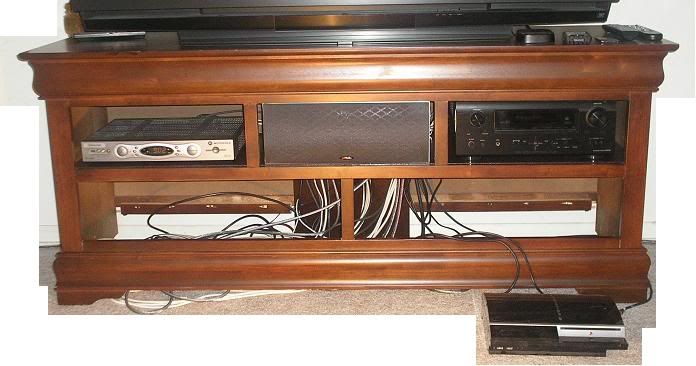
Now, that bottom shelf is just a place holder. I plan to install replacement bottom and new mid-level shelf this weekend. I figure for those I'm best off using 3/4" MDF....want it to be strong. I do plan to vent the shelves some too. (cut slots with my router!)

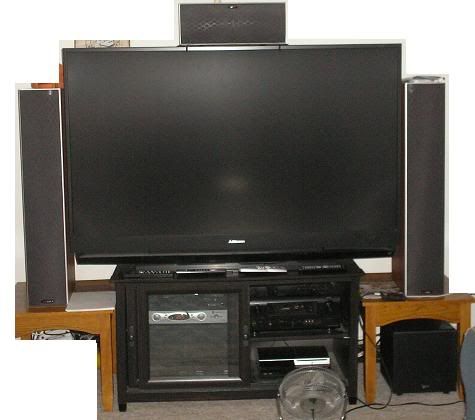
I also will move the center post on the top shelf, installing a second post. Dividing the top into 3 sections. That way I can place my center-channel in the middle. It currently resides on a shelf atop my 65" TV (it's a DLP)

OK, I know what you're all thinking, "I could do all that in ONE day, with the right tools and a shop!" ----so here's a picture of the tools I used. And I'll just tell you, I did all this work in my living-room.


Not included in this picture: Vacuum (figure you guys have see an old, stand-up, bag-style vacuum before)


~~~~~~~~~~~~~~~~~~~~~~~~~~~~~~~~~~~

Programming of Nav Unit: 5-minutes
Gas for the SUV: $40
Used dresser (AND HUGE MIRROR): $90
Time it took to flip the mirror over (seller loaded it shiny side up...trying to kill me I guess): 5-minutes
Amount of pride that I can stand on the top of my custom altered unit an NOT hear any creaks or cracks: HUGE

thank you, that is all
~~~~~~~~~~~~~~~~~~~~~~Addition~~~~~~~~~~~~~~~~~
Couldn't believe I didn't have a finished shot in this post:


Last edited by NorCo_1806; 06-10-2010 at 03:45 PM.
  Reply With Quote
Old 02-18-2010, 04:22 PM   #2
Bizdady Bizdady is offline
Blu-ray Duke
 
Bizdady's Avatar
 
Nov 2007
8 1 8 Biatch!! L.A.
21
209
1
38
Default

Very nice! My wife would kill for something like that, she loves vintage furniture. I love sleek black and metal lol. Great job on your custom stand.
  Reply With Quote
Old 02-18-2010, 04:28 PM   #3
jaydoc24 jaydoc24 is offline
Active Member
 
jaydoc24's Avatar
 
Jan 2008
12
142
Default

Great job NorCo, love to see the DIY projects people take on. I'd have never thought of that. Nice idea. Post a pic when you get your MDF in too.

If you want to get really crazy and have a router, you could install some cool doors on the front...even with a pane of glass in them. Either way, nice work.
  Reply With Quote
Old 02-18-2010, 04:29 PM   #4
thePhoenix thePhoenix is offline
Power Member
 
thePhoenix's Avatar
 
Aug 2009
Believeland
7
106
11
Default

Can't view the pictures here at work. Can you upload them as a file and not from photobucket? I would love to see your handywork.
  Reply With Quote
Old 02-18-2010, 05:41 PM   #5
NorCo_1806 NorCo_1806 is offline
Blu-ray Samurai
 
NorCo_1806's Avatar
 
Aug 2009
Colorado
41
465
94
1
Default

Quote:
Originally Posted by thePhoenix View Post
Can't view the pictures here at work. Can you upload them as a file and not from photobucket? I would love to see your handywork.
I've saved the two pictures to my HT gallery. Good thought!
  Reply With Quote
Old 02-18-2010, 05:46 PM   #6
NorCo_1806 NorCo_1806 is offline
Blu-ray Samurai
 
NorCo_1806's Avatar
 
Aug 2009
Colorado
41
465
94
1
Default

Quote:
Originally Posted by jaydoc24 View Post
Great job NorCo, love to see the DIY projects people take on. I'd have never thought of that. Nice idea. Post a pic when you get your MDF in too.

If you want to get really crazy and have a router, you could install some cool doors on the front...even with a pane of glass in them. Either way, nice work.
I've considered using two drawer-fronts, with hinges so they'd fold down...for the bottom two.

Each opening is about 31" wide...so doors that split that would be kinda big.

When I split the top shelf into 3 sections, they'll each be 19" wide. Which I thought was just about perfect.

My TV is 58" wide, so I struggled to find a cabinet that was as wide or wider. That's kinda what lead me to this dresser.
  Reply With Quote
Old 02-18-2010, 05:47 PM   #7
Fors* Fors* is online now
Moderator
 
Fors*'s Avatar
 
Jan 2009
Pottstown, PA
160
12
142
11
Default

Nice work....that looks great!
  Reply With Quote
Old 02-18-2010, 06:43 PM   #8
DAK4 DAK4 is offline
Member
 
Jul 2009
Peoria, Arizona
59
Default

Cool idea! I think that piece you bought is an exact match to my family room furniture(no joke)
  Reply With Quote
Old 02-20-2010, 03:27 AM   #9
anet99999 anet99999 is offline
Active Member
 
anet99999's Avatar
 
Apr 2009
Wisconsin
2
565
14
9
Default

Much respect for the DIY. Can't wait to see pics of the finished product.
  Reply With Quote
Old 02-22-2010, 03:28 PM   #10
NorCo_1806 NorCo_1806 is offline
Blu-ray Samurai
 
NorCo_1806's Avatar
 
Aug 2009
Colorado
41
465
94
1
Default

Here's the next photo in my cabinet build. I'm still waiting on my banana-plug wall plate and other stuff. At that time I'll be able to shorten that mass of cables. Then install the lower shelf. Move that PS3 into the cabinet.

  Reply With Quote
Old 02-22-2010, 03:48 PM   #11
NorCo_1806 NorCo_1806 is offline
Blu-ray Samurai
 
NorCo_1806's Avatar
 
Aug 2009
Colorado
41
465
94
1
Default

I realized this project has made a huge difference to me, because I've lived with something else a while. But you guys don't know what that "something else" was....so here it is:


I've moved my fronts back to the floor...only had them on those end-tables because the center-channel was on top of the TV. The center is now a tad low, and the fronts aren't exactly in-line.....but they're close enough for me and my ears.....for now anyway.
  Reply With Quote
Old 02-23-2010, 07:34 PM   #12
NorCo_1806 NorCo_1806 is offline
Blu-ray Samurai
 
NorCo_1806's Avatar
 
Aug 2009
Colorado
41
465
94
1
Default

OK, banana plug & coax/RCA wall plates came in. Installed those, made fancy speaker wire jumpers from AVR to wall plates.

Installed bottom shelves. Routed wires as best I could for now. Prettier than what I've had before. And since this cabinet sits back against the wall, when you look behind it, all you see is a couple wires running to the TV and the iPod dock.

I ended up putting my Monster Cable surge protector under the PS3 shelf.

Then, one final hiding step, I put a bunch of movies on the bottom shelf. Don't think I'll leave them there. I need to figure out something though. But it is nice that the shelf is just the right height....for most Blu's.


oops, darn power wires show under the cabinet. Think I'll put the movies back where they go, show another shot of the wire routing...it's not pretty, but not bad.
  Reply With Quote
Old 02-23-2010, 07:46 PM   #13
DAK4 DAK4 is offline
Member
 
Jul 2009
Peoria, Arizona
59
Default

Maybe you could use the drawer fronts on the bottom with hinges that fold down.
  Reply With Quote
Old 02-23-2010, 08:05 PM   #14
NorCo_1806 NorCo_1806 is offline
Blu-ray Samurai
 
NorCo_1806's Avatar
 
Aug 2009
Colorado
41
465
94
1
Default


That large red "cable" is the bundle of power wires routing to my surge protector. And yes, I still need to push that wire back under the front-right side.
  Reply With Quote
Old 02-23-2010, 08:07 PM   #15
NorCo_1806 NorCo_1806 is offline
Blu-ray Samurai
 
NorCo_1806's Avatar
 
Aug 2009
Colorado
41
465
94
1
Default

Quote:
Originally Posted by DAK4 View Post
Maybe you could use the drawer fronts on the bottom with hinges that fold down.
I thought about that...then I could keep my WEED in there...and no one would know!!

not sure yet, may just leave them open for a while
  Reply With Quote
Old 02-23-2010, 08:19 PM   #16
DAK4 DAK4 is offline
Member
 
Jul 2009
Peoria, Arizona
59
Default

Quote:
Originally Posted by NorCo_1806 View Post
I thought about that...then I could keep my WEED in there...and no one would know!!
Fashizzle.

Last edited by DAK4; 02-23-2010 at 08:35 PM.
  Reply With Quote
Old 02-23-2010, 09:18 PM   #17
ZIPPO ZIPPO is offline
Blu-ray Guru
 
ZIPPO's Avatar
 
May 2008
Columbus, Ohio
148
472
3
3
Default

Quote:
Originally Posted by NorCo_1806 View Post
I realized this project has made a huge difference to me, because I've lived with something else a while. But you guys don't know what that "something else" was....so here it is:
Quote:
Originally Posted by NorCo_1806 View Post
VERY NICE JOB ON THIS DIY PROJECT!
  Reply With Quote
Old 02-23-2010, 09:27 PM   #18
JJJMan JJJMan is offline
Member
 
JJJMan's Avatar
 
Jan 2008
Pembroke, NH
34
302
Default

really coming together! i like it!
  Reply With Quote
Old 02-24-2010, 11:56 AM   #19
NorCo_1806 NorCo_1806 is offline
Blu-ray Samurai
 
NorCo_1806's Avatar
 
Aug 2009
Colorado
41
465
94
1
Default

I'll mention this too....the 10" fan that sat in front of the old set up has been replaced. I've got a 4" fan sitting behind the center-channel, blowing across the back of the AVR. I suppose that means it pulls air from the cable box side, creating all-around air flow.

I can hear the fan as soon as I turn on the AVR. But when the TV is on I can hear the fan in it too. So it's not really distracting.

I've considered a couple USB fans for the lower shelf. Figure the PS3 has the ability to power them. But with all that open space, I'm hoping the PS3 will be fine. It actually never over-heated in the old cabinet, even with no fan and the door closed. --I'm just paranoid!!
  Reply With Quote
Old 02-24-2010, 01:01 PM   #20
Scooby Blu Scooby Blu is offline
Power Member
 
Scooby Blu's Avatar
 
Apr 2008
7
Thumbs up Wow!

Looks great! I wish I was handy, instead of dropping 1,200 on my stand.
  Reply With Quote
Reply
Go Back   Blu-ray Forum > Home Theater > Home Theater Construction

Similar Threads
thread Forum Thread Starter Replies Last Post
Custom A6-6T6 MTM Center Channel Stand... Home Theater Construction duder1234 40 03-17-2010 06:46 PM
Monitor Audio / Custom TV stand 3/15/10 Home Theater Galleries Petey2133 21 03-16-2010 03:37 PM
my custom subwoofer Subwoofers demazi 3 01-16-2009 05:15 AM
Custom Inserts General Chat Moviefan1203 1 10-18-2008 02:01 AM
Custom Charges Blu-ray Movies - North America Son_Of_Sam 1 05-30-2007 07:46 PM


Posting Rules
You may not post new threads
You may not post replies
You may not post attachments
You may not edit your posts

BB code is On
Smilies are On
[IMG] code is On
HTML code is Off

Forum Jump


All times are GMT. The time now is 12:34 PM.